BT (britishtelephones)
CONVERSE 200 & 300
Английский дихайн, английское качество!
TELEPHONES 5051AR & 5052AR
 |
 |
| Converse 200 | Converse 300 |
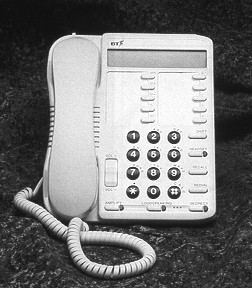
The Converse range of telephones are available for rental
and retail sales. Both models are of conventional two piece design. The
converse 300 (shown on the right) incorporates Loud Speaking Telephone
(LST) facilities. Additional facilities for the 'hard of hearing' and
'disabled' user are also incorporated.
Features common to both models in the Converse range are as follows:-
20 Number Memory (24 digit)
Speech Amplification (with LED & Level Control)
Incoming Call Indicator (flashing LED)
Inductive Coupler
Latching Secrecy Button (with LED)
Last Number Redial (24 digits)
Ringer Volume Control (Hi/Lo/Off)
Ringer Tone Options (R1/R2/R3 - three different output frequencies)
Touch Tone Dialling (TE/TB)
Pulse Dialling (PE)
Pause Facility
Wall-mountable
2 Years Guarantee
Additional feature provided on the Converse 200:-
On Hook Dialling
Additional features provided on the Converse 300:-
Full Hands-free Operation
Liquid Crystal Display (with clock)
Additional Earpiece Option
Headset Option
Note. There are three types of head set available as follows:
Headset 1. - Low cost headband type and is non repairable.
Headset 2. - High quality headband type that has an adjustable voice tube
and a quick disconnect facility. Spares are available and should be
purchased direct from the manufacturer as required.
Headset 3. - High quality over the ear type that has an adjustable voice
tube and a quick disconnect facility. Spares are available and should be
purchased direct from the manufacturer as required.
Voice amplification is available when using the headsets.
When wall mounting the telephone it may be necessary to reverse the
handset clip, to support the handset. The base moulding incorporates a
'Handset hook' feature which enables the user to hang the handset up if
they need to leave the phone during a conversation. This saves the user
having to find somewhere to put the receiver or leave it suspended on
the end of the handset cord.
Made by Inventec.
Distributed, rented and sold by BT.
APPROVAL STATUS
Approved under Approval numbers:-
S/2981/3/M/502290 Converse 200
S/2981/3/M/502291 Converse 300
For use on DELs and PBXs in categories 1,3,5,7,9 & 11. Modifications which
have not received appropriate approval must not be carried out. To do so
would invalidate approval making connection unlawful.
DOCUMENTATION
User Guides: (both Guides include wall mounting template)
PHME 8021 (Converse 200).
PHME 8022 (Converse 300).
PLANNING
REN, both telephones in the Converse range have a REN of 1.5 and are
intended for use in normal Domestic/Residential locations or connected
to any approved PBX.
The base unit has a reversible wedge which can be turned round for wall
mounting. The telephone cannot be used without the wedge.
Approximate overall dimensions are:
Converse 200 220ram x 185mm x 9Omm, weight 830 grams.
Converse 300 22Omm x 185mm x 9Omm, weight 830 grams.
Two 25mm x No.8 pan-head wood screws and wall plugs are provided for wall
mounted use via key-hole slots in the base of the units.
Three good quality AA or R6 size batteries are required for the Converse
300. Batteries allow memory programming on hook and retain memories
whilst the phone is unplugged. The first act of batteries will be
supplied with rented phones, but not with sold phones and it is the
users responsibility to provide any subsequent battery replacements for
both sold and rented phones.
INSTALLATION/COMMISSIONING
Converse telephones are supplied with a line cord terminated by a plug for
use in Phone Sockets. The telephones will be supplied with the
signalling switch set to TB.
LINE TESTING
Idle - Normal capacitor loop, additionally these telephones draw on-hook
current (typically 10 micro Amps) to maintain stored/last number memory.
This may give apparent 'Low Loop' line test conditions.
Seized - Normal press button telephone loop. The electronic keypad and
transmission circuitry may give 'high resistance' tele loop line test
conditions as with other press button telephones.
ADDITIONAL INFORMATION
Signalling details:
MF signalling,
- All models, continuous tone whilst button is pressed.
Timed break recall,
- All models, approximately 90 ms.
Earth recall,
- All models, minimum of 720 ms up to a maximum of 1.2 seconds.
PBX Interworking:
Some facilities are not available when Converse range telephones are
connected to a Renown or BT2+8. Please refer to CFN Voice - BT2+8/Renown
003 compatibility with modern telephones.
Taken from BT CSI No. 302
USER GUIDE - For the Converse 300
Storing numbers in the 1-Key memory
You can store up to 10 numbers in this way.
1. Pick up the handset or press the loudspeaking button.
2. Press STORE, display will show A.
3. Press one of the memory keys.
4. Key in the phone number you want to store.
5. Press STORE again.
6. Replace the handset or press the loudspeaking button as appropriate.
7. Write down the name of the person, whose number you have just stored.
Storing numbers in the 2-Key memory
You can store up to 10 numbers in this way.
1. Pick up the handset or press the loudspeaking button.
2. Press STORE.
3. Press SHIFT, the display will show B.
4. Press one of the memory keys.
5. Key in the phone number you want to store.
6. Press STORE again.
7. Replace the handset or press the loudspeaking button as appropriate.
8. Write down the name of the person, whose number you have just stored.
Dialling Stored Numbers
To call a number using 1-Key dialling
- Pick up the handset or press the loudspeaking button.
- Press the memory key of the number you want to call. The Converse 300 will automatically dial the number.
To call a number using 2-Key dialling
- Pick up the handset or press the loudspeaking button.
- Press SHIFT, display will show B.
- Press the memory key of the number you want to call. The Converse 300 will automatically dial the number.
Using the Amplify Facility
- Set the Converse 300 to either INCOMING or OUTGOING amplify.
- Lift the handset.
- Press AMPLIFY and the red light will come on.
- Speak to your caller.
- Adjust the volume control as necessary.
- When you’ve finished the call, replace the handset. The amplify facility will automatically switch off and the light will go out.
Loudspeaking
To get the best use out of the Loudspeaking facility, make sure you wait until your caller has finished speaking, before you speak.
Making a call
- Press the LOUDSPEAKING button.
- The red light will come on.
- When you hear the dialling tone, dial the number required.
- If the call is answered, then continue, by talking to your caller.
- Press the LOUDSPEAKING button when finished.
Answering a call
- When the telephone rings, press the LOUDSPEAKING button, and talk to your caller.
- To finish the call press the LOUDSPEAKING button.
Switching between the loudspeaker and the handset.
- If using the handset, simply press the LOUDSPEAKING button, then replace the handset.
- If using the loudspeaker, simply pick up the handset and continue the conversation.
Calculator Facility
Converse 300 has been fitted a calculator facility. This enables the user to carry out simple numerical calculations. It allows the following functions to be carried out, addition, subtraction, multiplication, division and percentages.
Calculator Operation
Starting up the calculator
- To start the calculator, simply press the SHIFT button and then the # button. This will bring up the message “CALC’ on the display
- Once the mode has been entered all the function keys for the calculator mode, become active.
Using the calculator and answering a call
- If you are using the calculator and the phone rings, simply answer the phone by picking up the handset or by pressing the LOUDSPEAKING button.
- When the call has ended simply replace the handset or press the LOUDSPEAKING button.
Note: Answering the call will not effect the operation of the calculator.
Making a call and then using the calculator
- The call must be made before the calculator is operated.
- Make the call by pressing the LOUDSPEAKING button, or picking up the handset. Wait for the dial tone, and then dial the number.
- Once the number has been dialled, the calculator can be operated. (By pressing the SHIFT button and then the # button.
Leaving the calculator.
- The calculator can be left by pressing SHIFT and then # button.
- The calculator can also be left by storing a number in one of the memories.
- Alternatively the calculator will automatically switch off after 1 minute, from the last entry of a key.
Examples
Enter the calculator mode, by pressing the SHIFT button and then the # button.
Numeric examples.
- Press 15 + 75 = 90.
- Press 75.5 + 22.8 = 98.3.
- Press + 100.7= 199. (This adds the new number onto the total of the calculation before.)
- Press AC key = 0. (AC = All clear)
Subtraction, Multiplication and Division work in the same manner.
Memory examples.
- MRC - this means Memory Recall. (M+ adds results to the memory & M- subtracts result from the memory).
- Press 50 and M+
- Press 20 and M+
- Press MRC 70
- Press 10 and M
- Press MRC 60
NOTE: Pressing AC will clear all the memories and the calculator display.
Percentages.
- Press 1500 X 10% = 150 (This gives 10% of 1500)
- Press 1000 X 17.5% = 175
- Press 10 ч 200% = 5
NOTE: To transfer a call while in calculator mode, you must first switch off the calculator.
Setting the time on the Converse 300
- Remove the right memory label.
- Press the STORE button and then the TIMESET button.
- Using the Key Pad enter the time, remembering to enter in a 24 hour clock format.
- Finally press the STORE button.